One of the most important differentiating features of Fastify is its Plugin System and the encapsulation concept. These two features are synonymous as we are talking about the same thing.
The Plugin System is a powerful tool that allows you to build a modular application. Unfortunately, it is also the most misunderstood feature of Fastify. This article will show how it works and how to avoid common mistakes. We are going to view the encapsulation with awesome images to make it easier to understand.
What is encapsulation?
Encapsulation is not a new engineering concept nor a Fastify exclusive feature. It is the Plugin System base concept, and you can't ignore it if you want to take advantage of Fastify.
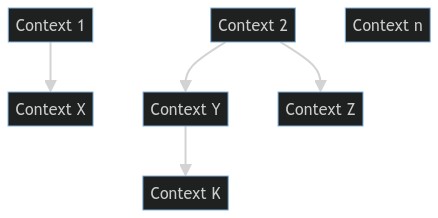
You can read its formal description on the Wikipedia page. Briefly, it is a mechanism that allows you to create an isolated context from another application's contexts. Here is a simple representation of three encapsulated contexts:
What does it mean? This concept may seem trivial, but it is very powerful:
Each context can have its own state.
Each context can't access the state of other contexts.
It is possible to create a context with the same code but different states.
Encapsulation and Inheritance
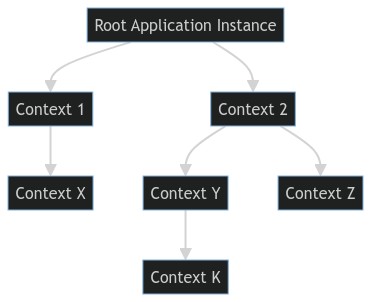
The encapsulation concept can be pushed to the extreme by adding the inheritance behaviour. In this case, the encapsulation is not only a mechanism to isolate the contexts, but also a mechanism to create a new context from others.
Here is a descriptive image:
This new image shows us three different Rooted trees. It is more complex, but it is very powerful because it defines new behaviours:
Each context may have child contexts.
Each context could have at most one parent context.
Each context can access the state of its parent context.
That being said, we have mentioned all the concepts we need to understand the Fastify encapsulation. Let's see how it works in Fastify.
The Plugin System demystified
In one sentence: Fastify's Plugin System is an encapsulated context builder. No more, no less.
The Plugins System has these pillars:
There is only one root context, and all the plugins are children of it
The parent context can't access the state of the child contexts
The children's context can access the state of the parent's context
I'm used to calling the root context the root application instance and every child context as plugin instance.
Since we have a root context, every Fastify application can be represented as a tree structure where every node is a context.
Let's take a look at some code to understand better how it works.
Create a new project:
mkdir fastify-encapsulation
cd fastify-encapsulation
npm init --yes
npm install fastify
touch app.js
In a new app.js file, add the following code:
const fastify = require('fastify')

start()

async function start() {
  const app = fastify({ logger: true })
  await app.listen(8080)
}
The app variable in the previous code is the root application instance or Fastify's root context.
Let's try to create some contexts, as shown in the previous image.
To do this, we need to call the register method.
Edit the start function as follows:
const app = fastify({ logger: true })

app.register(async function pluginOne (instance, opts) {
  // context 1
  instance.register(async function pluginX (instance, opts) {
  // context X
  })
})

app.register(async function pluginTwo (instance, opts) {
  // context 2
  instance.register(async function pluginY (instance, opts) {
    // context Y
    instance.register(async function pluginK (instance, opts) {
      // context K
    })
  })
  instance.register(async function pluginZ (instance, opts) {
    // context Z
  })
})
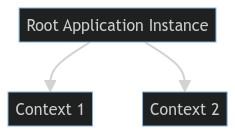
By doing this, we are creating two child contexts from the root context.
Note that the first argument of the register method is a function that represents the plugin instance. Its first argument, named instance is the context itself and gives us access to all of Fastify's server methods.
We can visualize our code structure as follows, but it will look like the previous image that we recreate with the Fastify Plugin System:
As you can see, the root context is the parent of the two children contexts. This representation shows the tree structure of the application.
But, what is the difference between each context?
The encapsulated context state
As we said before, each context has its own state. In Fastify, the state is represented by:
The context's routes
The context's settings and plugins
The context's decorators
The context's hooks
This means that every time you create a new context by calling the register method, you can pass a new set of options, settings, etc.
Moreover, the inheritance implementation inherits the parent context's state. In practice, this means that the child contexts inherit the parent's: hooks, decorators, settings and plugins.
const app = fastify({ logger: true })

// root application instance
// ❌ cannot access ctx1
// ❌ cannot access ctx2
app.decorate('rootDecorator', 42)

app.register(async function plugin (instance, opts) {
  // context 1
  // ✅ can access rootDecorator
  // ❌ cannot access ctx2
  instance.decorate('ctx1', 42)
})

app.register(async function plugin (instance, opts) {
  // context 2
  // ✅ can access rootDecorator
  // ❌ cannot access ctx1
  instance.decorate('ctx2', 42)
})
This behaviour is the brain of the Plugin System. In fact, you can play with the encapsulation to create a plugin that can be used in different contexts.
For example, we could modify to get the same result but reusing the same plugin function:
const app = fastify({ logger: true })

app.decorate('rootDecorator', 42)

app.register(plugin, { decoratorName: 'ctx1' })
app.register(plugin, { decoratorName: 'ctx2' })

async function plugin (instance, opts) {
  instance.decorate(opts.decoratorName, 42)
}
Here it should become clearer how encapsulation works and its benefits:
you can split your source code into different source files/plugins
load plugins with different settings (e.g.: connect to many MongoDB connections by registering the plugin twice and changing the connection URL)
add hooks to a limited set of routes: the ones defined in the encapsulation context
In fact, if you try to rewrite our examples by moving the plugin function to a file, you will verify that you can't access the JavaScript closure anymore to read some external config, but you need to rely on the Fastify instance argument only!
This is Fastify's secret sauce!
Breaking the encapsulation
You may have seen the fastify-plugin module that "breaks the encapsulation". But why do we need to break the encapsulation?
Let's see the previous example's structure:
If I would like to access the ctx1 decorator from the root context, I can't do it, unless I break the encapsulation by wrapping the plugin function with the fastify-plugin module:
const fp = require('fastify-plugin')
const app = fastify({ logger: true })

app.decorate('rootDecorator', 42)

app.register(fp(plugin), { decoratorName: 'ctx1' })
app.register(plugin, { decoratorName: 'ctx2' })

async function plugin (instance, opts) {
  instance.decorate(opts.decoratorName, 42)
}
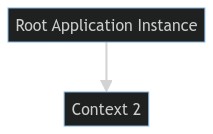
Now the application schema will look like this because we broke the ctx1 context, and the parent swallowed it:
Now, the app instance has access to the ctx1 decorator.
Note that every plugin you will install will be wrapped with the fastify-plugin module, otherwise if the plugin adds a database connection, it will be encapsulated and inaccessible from the parent context!
Why is the Plugin System not easy to understand?
We have seen the Plugin System and how it works, but why is it not easy to understand?
The answer is simple: the Plugin System is a powerful tool, but it is not easy to control when things become bigger.
The most common mistake is when you create a plugin hell like the following:
app.register(async function plugin (instance, opts) {
  instance.register(async function plugin (instance, opts) {
    instance.register(function plugin (instance, opts, next) {
      instance.register(function plugin (instance, opts, next) {
        next()
      })
      next()
    })
    instance.register(function plugin (instance, opts, next) {
      next()
    })
    instance.register(function plugin (instance, opts, next) {
      instance.register(function plugin (instance, opts, next) {
        instance.register(function plugin (instance, opts, next) {
          next()
        })
        next()
      })
      next()
    })
  })
})
The plugin hell is not wrong, but it makes the code hard to read and understand. This denotes it is less maintainable, and you may be forced to add some global variables to solve some issues.
To solve this problem, you can use the fastify-overview plugin to visualize the tree structure and be able to navigate within your code base without any difficulties.
First, we need to install the plugin and configure it:
async function start() {
  const app = fastify({ logger: true })
  await app.register(require('fastify-overview'))
  // ... plugin-hell ...
  await app.ready()
  const appStructure = app.overview({ hideEmpty: true })
  require('fs').writeFileSync('./appStructure.json', JSON.stringify(appStructure, null, 2))
}
The code above starts the Fastify application and exports the tree structure in a JSON file. Now, you should have a file named appStructure.json in your project's root directory.
The stored file can be used to visualize the tree structure of your application.
You can use the fastify-overview-ui plugin or the https://jsoncrack.com website.
Copy the content of the appStructure.json file and paste it into the https://jsoncrack.com website, you will see the detailed data structure of your application, and you will be able to understand where each component is stored in your codebase.
Thanks to the plugin, you will be able to see the runtime application graph:
🛣 ALL the Fastify routes
🍱 ALL the Fastify plugins
🎨 ALL the Fastify decorators
🪝 ALL the Fastify hooks
For example, you will see any additional settings that a third-party plugin adds to your Fastify instance that you may not be aware of.
Summary
You have read how Fastify implements encapsulation through the Plugin System and its powerful features. Moreover, you have seen how to use the fastify-overview plugin to visualize your application's tree structure to debug and explore it more easily.
If you want to learn more about the Plugin System, you can pre-order the Fastify Book that will deep dive into this topic and a lot more!
If you enjoyed this article, comment, share, and follow me on Twitter @ManuEomm!


